Monday, 26 January 2015

Camera Types

Simply a list of every possible type of camera I could think of and find on the internet.


Camera, the general term.
Still camera, a device used to take photographs, singly
Instant camera, a type of camera with self-developing film
Schmidt Camera
Single-lens reflex camera
Twin-lens reflex camera
Wright Camera
View camera


Video camera, a portable electronic device for recording video images and audio onto a storage device
Camcorder, a portable video camera used by consumers
Closed-circuit television camera, is used for surveillance that is generally fixed, with the exception of being able to swivel
IP camera
Professional video camera, is used in commercial television production that may or may not be mobile
Remote camera
Traffic camera
Movie camera

Camera phone, a mobile phone combined with a built-in digital camera

Others
Pinhole camera
Pocket camera
Mirrorless interchangeable-lens camera
Toy camera
Trail camera
Digital camera, an electronic device used to capture and store photographs electronically


The term camera is also used, for devices producing images or image sequences from measurements of the physical world, or when the image formation cannot be described as photographic. Examples areMagnetic resonance imaging is sometimes called a MRI camera which produce images showing, internal structure of different parts of a patient's body.
Polaroid camera
Rangefinder camera which produce images of the distance to each point in the scene,
Ultrasonography uses ultrasonic cameras that produce images of the absorption of ultra-sonic energy, and
Virtual camera, in computing and gaming


Here are some image type samples.
Dslr


Pinhole


35mm


Polaroid


Long exposure


Bridge Camera


Schmidt camera

Photoshop Selection Tool

Selecting The Quick Selection Tool

To select the Quick Selection Tool, click on its icon in Photoshop's Tools panel, or press the letter W on your keyboard to select it with the shortcut:
The Quick Selection Tool in Photoshop. Image © 2010 Photoshop Essentials.com
The Quick Selection Tool is found near the top of the Tools panel.

Making Selections

Here's an image I have open in Photoshop:
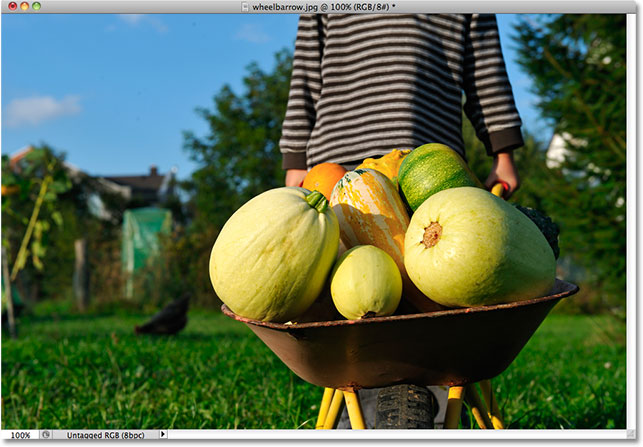
A child pushing a wheelbarrow filled with pumpkins. Image licensed from Shutterstock by Photoshop Essentials.com
The original image.
For this image, I'd like to keep the original colors in the main subject (the child pushing the wheelbarrow filled with pumpkins) and colorize the rest of the background with a single color. To do that, I'll first need to select the main subject. I could try drawing a freehand selection around everything with the Lasso Tool, but Lasso Tool selections tend to look rough and unprofessional. The Pen Tool would work great with this image thanks to all the sharp edges and smooth curves, but drawing a path around the main subject would take some time. The Magnetic Lasso Tool would also work well due to the strong contrast between the main subject and the background. But let's see how well the Quick Selection Tool can select the area we need.
To begin my selection, I'll move the Quick Selection Tool's cursor into the top left corner of the child's sweater and I'll click once with my mouse. An initial selection outline appears around the area I clicked on:
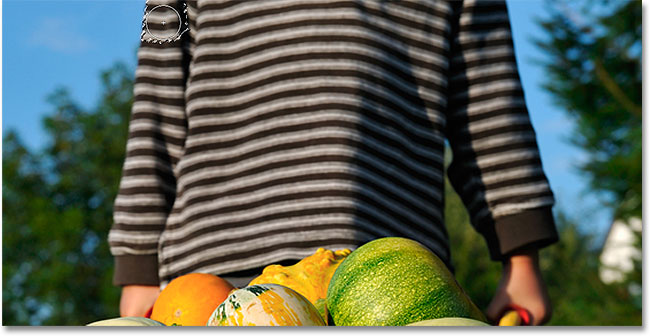
Clicking on the image with the Quick Selection Tool. Image © 2010 Photoshop Essentials.com
An initial selection outline appears in the top left of the sweater.
So far so good, but obviously there's much more I still need to select, which means I'll need to add to my existing selection. Normally, to add to a selection, we need to hold down the Shift key on the keyboard to switch the tool to its "Add to selection" mode, but the Quick Selection Tool is different. It's already in "Add to selection" mode by default, indicated by the small plus sign (+) displayed in the center of the tool's cursor.
If you look in the Options Bar along the top of the screen, you'll see a series of three icons which let us switch between the tool's three selection modes (from left to right - New selectionAdd to selection and Subtract from selection). The "Add to selection" option (middle one) is already chosen for us, since the whole point of the Quick Selection Tool is to continue adding to the selection until you've selected everything you need:
The three selection mode icons for the Quick Selection Tool in the Options Bar. Image © 2010 Photoshop Essentials.com
The "Add to selection" mode is already chosen by default with the Quick Selection Tool.
There's two ways to use the Quick Selection Tool. One is to simply click on different areas of the image just like we would with the Magic Wand, and just as I did a moment ago to begin my selection. The more common way, though, is to click and drag over the area you need to select as if you were painting with a brush. As you drag, Photoshop continuously analyzes the area, comparing color, tone and texture, and does its best job to figure out what it is you're trying to select, often with amazing results.
To add to my initial selection, then, I'll simply click and drag along the left edge of the sweater. The area I drag over is added to the selection. As long as I keep the cursor inside the sweater and don't drag over the sky or the trees in the background, only the sweater itself gets added:
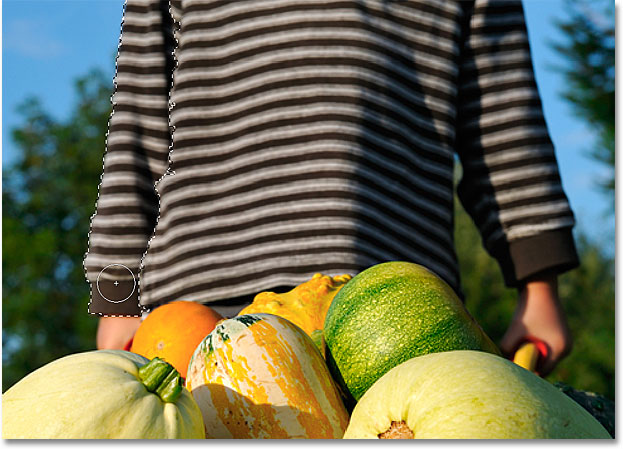
Adding the sweater sleeve to the selection. Image © 2010 Photoshop Essentials.com
Keep the cursor over the area you want to add to the selection.
If I do accidentally extend my cursor into the background area, the background gets added to the selection as well, which isn't what I want. If that happens, press Ctrl+Z (Win) / Command+Z (Mac) on your keyboard to undo it and try again. A bit later on, we'll see how to remove unwanted areas of a selection with the Quick Selection Tool, but a good habit to get into here is to not try to select everything in a single drag. If you do, and you make a mistake and need to undo it, you'll undo everything you've done. Using a series of short drags, releasing your mouse button between each one, is a better and safer way to work:
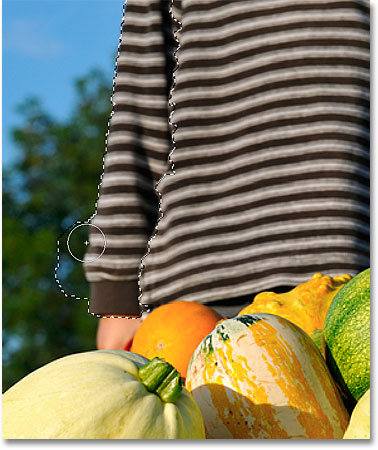
Accidentally selecting part of the background. Image © 2010 Photoshop Essentials.com
Part of the background is accidentally selected. Press Ctrl+Z (Win) / Command+Z (Mac) to undo.
I'll continue clicking and dragging over the sweater to add it to my selection:
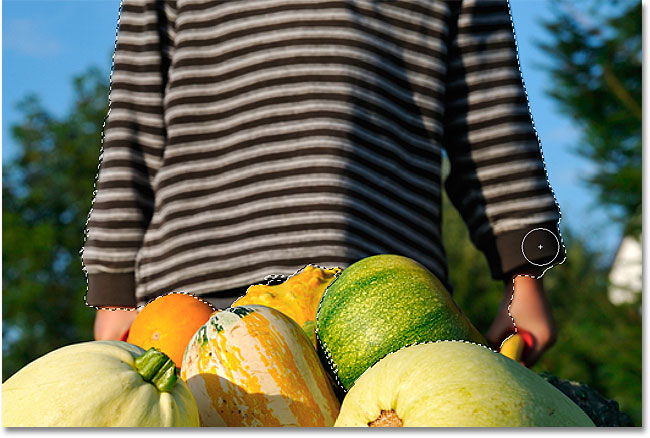
Adding the rest of the sweater to the selection with the Quick Selection Tool. Image © 2010 Photoshop Essentials.com
Adding the rest of the sweater to the selection was as easy as dragging over it.
Resizing The Cursor
If you have a large area to select, you may want to increase the size of the cursor so you won't need to drag as much (I know, us Photoshop users can be a lazy bunch sometimes). Likewise, selecting smaller areas often requires a smaller cursor. The Quick Selection Tool's cursor can be resized quickly from the keyboard the same way we'd resize a brush. Press the left bracket key ( [ ) to make the cursor smaller or the right bracket key ( ] ) to make it larger. Typically, a smaller cursor will give you more accurate results.
I'll increase my cursor size a little and continue dragging over the pumpkins and the wheelbarrow to add them to my selection. In the few seconds it took me to drag over things with the Quick Selection Tool, Photoshop was able to do a pretty outstanding job of selecting my main subject for me:
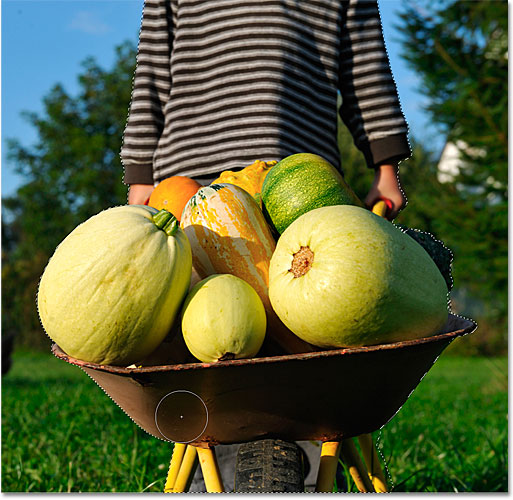
The main subject has been selected. Image © 2010 Photoshop Essentials.com
The initial selection of the main subject is complete. Estimated time: 10 seconds.

Subtracting From A Selection

The Quick Selection Tool did an impressive job with the initial selection of my main subject, but it's not perfect. There's a few areas here and there that need to be removed from the selection, like this gap between the sweater and the child's arm where the background is showing through:
An area that needs to be removed from the selection. Image © 2010 Photoshop Essentials.com
The Quick Selection Tool selected a few areas that shouldn't have been included.
To remove an area from a selection, hold down your Alt (Win) / Option (Mac) key, which temporarily switches the Quick Selection Tool to Subtract from selection mode (you could also select the "Subtract from selection" option in the Options Bar but you'd need to remember to switch it back to the "Add to selection" mode when you're done). The small plus sign in the center of the cursor will be replaced with a minus sign (-). Then, with Alt / Option still held down, click and drag inside the area you need to remove. I'll need to make my cursor smaller here by pressing the left bracket key a few times:
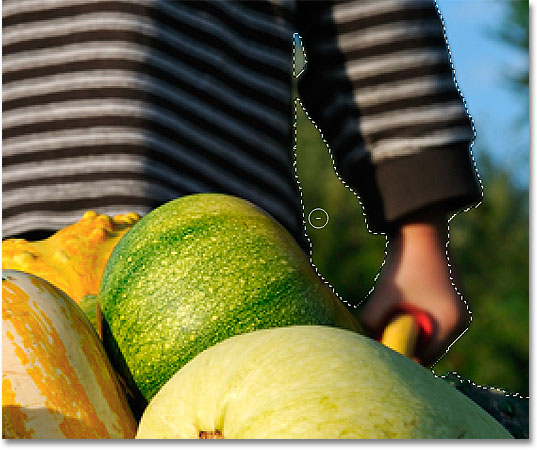
Subtracting an area from the selection with the Quick Selection Tool. Image © 2010 Photoshop Essentials.com
Hold down Alt (Win) / Option (Mac) and drag over areas you need to remove from the selection.
I'll do the same thing along the bottom of the wheelbarrow where the background is showing through. It often helps to zoom in on the image to remove smaller areas like these:
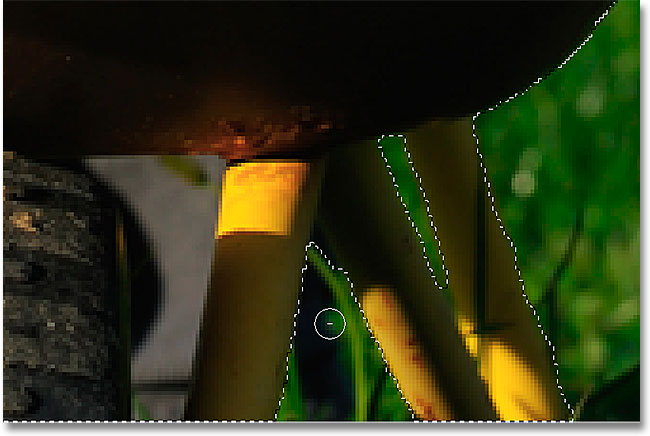
Removing selection areas from the bottom of the image. Image © 2010 Photoshop Essentials.com
A few more unwanted areas to remove.
And with that, my selection is complete! Not bad at all for a minute or two's worth of effort:
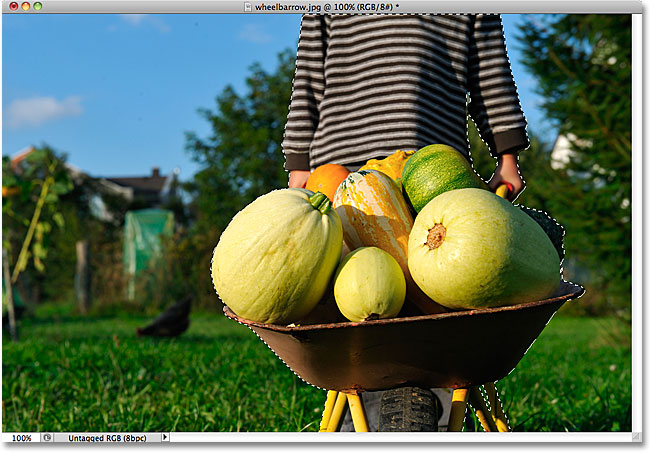
A selection made with the Quick Selection Tool in Photoshop. Image © 2010 Photoshop Essentials.com
The final selection.
With my main subject now selected, to colorize the background, I'll invert the selection by pressing Shift+Ctrl+I(Win) / Shift+Command+I (Mac), which will deselect my main subject and select everything around it instead. Then I'll click on the New Adjustment Layer icon at the bottom of the Layers panel:
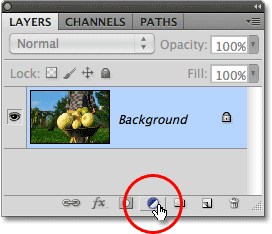
The New Ajustment Layer icon in the Layers panel in Photoshop. Image © 2010 Photoshop Essentials.com
The New Adjustment Layer icon.
I'll choose a Hue/Saturation adjustment layer from the list:
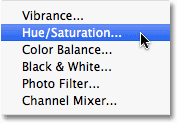
Choosing a Hue/Saturation adjustment layer in Photoshop. Image © 2010 Photoshop Essentials.com
Choosing a Hue/Saturation adjustment layer.
If you're using Photoshop CS5 as I am, the Hue/Saturation controls will appear in the Adjustments Panel. In CS4 and earlier, the Hue/Saturation dialog box will appear. To colorize the image, I'll select the Colorize option by clicking inside its checkbox. Then I'll drag the Hue slider a little towards the right to select a brown color similar to the color of the wheelbarrow:
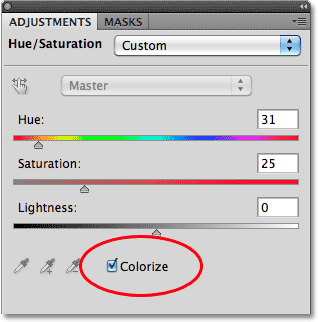
The Hue/Saturation controls in Photoshop. Image © 2010 Photoshop Essentials.com
Select "Colorize", then dial in a color with the Hue slider.
Click OK to exit out of the Hue/Saturation dialog box when you're done (Photoshop CS4 and earlier only). Finally, I'll change the blend mode of my adjustment layer to Color so that only the colors in the image, not the brightness values, are affected:
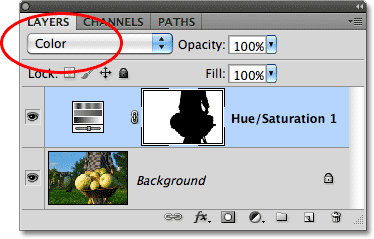
Changing the layer blend mode of the adjustment layer to Color. Image © 2010 Photoshop Essentials.com
Change the blend mode to "Color".
Here, after changing the blend mode to Color, is my final result:
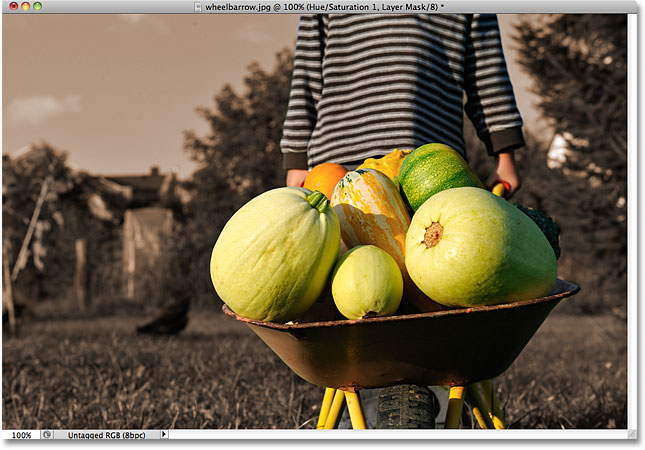
Photoshop colorizing background effect. Image © 2010 Photoshop Essentials.com
The Quick Selection Tool made colorizing the background easy.

Additional Options

The Quick Selection Tool includes a couple of additional options in the Options Bar. If your document contains multiple layers and you want Photoshop to analyze all the layers when making the selection, check the Sample All Layers option. Leaving it unchecked tells Photoshop to include only the layer that's currently active (highlighted in blue) in the Layers panel:
The Sample All Layers option for the Quick Selection Tool. Image © 2010 Photoshop Essentials.com
Choose "Sample All Layers" if you want to include multiple layers in the selection.
If you're running Photoshop on a fairly powerful computer, selecting the Auto-Enhance option can produce smoother, higher quality selection edges (they tend to look a bit blocky on their own), but you may find the Quick Selection Tool takes slightly longer to do its thing with Auto-Enhance enabled. I'd suggest turning Auto-Enhance on unless you find yourself running into performance problems:
The Auto-Enhance option for the Quick Selection Tool. Image © 2010 Photoshop Essentials.com
Auto-Enhance can give smoother results but may result in slower performance.
And there we have it!

Portrait Photography/Focusing

Portrait Photography.
Portrait photography often means using a wide aperture and longer focal lengths to create a shallow depth of field, throwing the background out of focus.
This makes focusing more important than usual, as sharpness is captured across a very narrow plane, often of just an inch or two. On top of this, you have a moving subject, so focusing on precisely the right point at precisely the right moment is crucial. 

The eyes are the most vital element of a portrait, so it’s essential to record them sharply, particularly if you’re using a wide aperture. Some photographers like to focus using the central focus point and then recompose, while others will set an off-centre focus point. Review the image properly by zooming in on the eyes to make sure they’re sharp.

some photographers focus using the central focus point, then half-press the shutter release to lock the focus, and recompose to place the subject off-centre. However, that slight movement when recomposing can be enough to throw the plane of focus off. For greater accuracy, use your SLR’s single-point autofocus. Most SLRs give you a choice of nine or more focus points, which can be selected via your camera’s rear joystick or dials. Setting an off-centre focus point over the subject’s nearest eye will give you an extra modicum of precision that could mean the difference between soft and sharp.

SLRs are almost always set up so that half-pressing the shutter triggers the autofocus.Lots of pros prefer a custom function that triggers autofocus with a rear button positioned where your thumb usually rests  (see your camera manual to see how to set it up).It takes some getting used to, but can give you greater control when focusing and composing your shot.
(Images sourced from wiki how because i cant upload my own from my memory stick atm).

Daylight dev Tank- developing film.

top paragraph sourced from wiki.
developing tank is a light-tight container used for developing film. A developing tank allows photographic film to be developed in a daylight environment. This is useful because most film is panchromatic and therefore can not be exposed to any light during processing. Depending upon the size and type, a developing tank can hold one to many roll or sheet films.

The steps to using one properly.

1. Open the film canister(35mm)
2. Then load the film onto a film reel in a completely dark enviroment, (so the images on the film arent destroyed). This could be a light tuight room or a changing bag? This is a vital step, not to be mesed up so take care!
3. Once the film is on the reel you put it into the developing tank, sealing the lid properly once in. Make sure to seal it properly as it prevents light from getting in to the tank.
4. Now the lids on the sealed tank with film in, the rest of the procedure can be carried out in daylight. In addition to protecting the film from light, the lid contains an opening for rapidly pouring liquids into and out of the developing tank. Finally, a separate cap seals the canister, which prevents the contents of the tank from spilling when agitated by inverting the tank.
Finally, rember to clean the tank with water every time after development because any left over residue fix may lead to not developing the film properly next time.

How to make a pinhole camera

Pinhole Camera


Step 1: Gather Materials

You will need a box, photo paper, thin piece of metal like a can or brass shim, tape, xacto knife, needle, and sand paper.

Step 2: Make Pinhole

The pinhole is like the lens of the camera. Poke a tiny hole in the brass shim with a needle and sand it smooth. Trim the shim so there is a little space around the hole.

Step 3: Make Camera Box

You can use a shoe box, oat meal box or whatever. The box must be light proof. When the lid is on and the shutter is closed the inside is completely dark. The only light comes through the pinhole. Make sure there are no holes or openings in the box. Seal it and paint it flat black. Cut a small square opening in the box for the pinhole to go in.

Step 4: Put In Pinhole And Make Shutter

Tape the pinhole behind the square opening. I use electrical tape. Center the pinhole in the square. Then make the shutter which is just a flap that covers the pinhole from the outside. It can be made from some more tape.

Step 5: Load The Photo Paper

This must be done in complete darkness. You can make a darkroom in a bathroom or closet and use it for developing and changing paper. Tape a piece of photo paper to the inside of the box across from the hole. Put lid on and make sure the shutter is closed. Now you can go out in the light.

Step 6: Taking A Picture

Point the camera at what you want to shoot. It works best when it is bright and sunny. Depending on lighting and clouds hold shutter open for 30 seconds to 4 minutes then close. Everything has to stay perfectly still. Go back to the dark room and take paper out to develop.

I've made one of these cameras within a college workshop at the start of the previous moduel.

iso- what is it?

What is ISO?
The camera’s ISO setting is its sensitivity to light. The higher the ISO, the more sensitive it is. This is measured according to international standards, so ISO100 on one camera will be exactly the same as ISO100 on another.
Each ISO setting is double the one before: if you increase the ISO from 100 to 200, you double the camera’s sensitivity; and if you increase it from 200 to 400, you double it again. This carries on through the ISO scale.
This is deliberate. The ISO settings are designed to double (or halve) the exposure in the same way that the lens aperture settings and shutter speed settings are, and this is why the lens aperture, shutter speed and ISO are often described as the ‘exposure triangle’.
For example, if you want to use a faster shutter speed without changing the aperture, you could increase the ISO instead.
This relationship between lens aperture, shutter speed and ISO could quickly get complicated, but there are drawbacks to changing the ISO which mean that in practice you tend to change the ISO only when you have to.

Apeture

Put most simply – Aperture is ‘the opening in the lens.’
When you hit the shutter release button of your camera a hole opens up that allows your cameras image sensor to catch a glimpse of the scene you’re wanting to capture. The aperture that you set impacts the size of that hole. The larger the hole the more light that gets in – the smaller the hole the less light.
Aperture is measured in ‘f-stops’.

Depth of Field and Aperture

Depth of Field (DOF) is that amount of your shot that will be in focus. Large depth of field means that most of your image will be in focus whether it’s close to your camera or far away (like the picture to the left where both the foreground and background are largely in focus – taken with an aperture of f/22).
Small (or shallow) depth of field means that only part of the image will be in focus and the rest will be fuzzy (like in the flower at the top of this post (click to enlarge). You’ll see in it that the tip of the yellow stems are in focus but even though they are only 1cm or so behind them that the petals are out of focus. This is a very shallow depth of field and was taken with an aperture of f/4.5).

Low and high key lighting

After discussing contrast at a very top level view, I would like to introduce two twins, closely related to contrast – High Key and Low Key.
Both High Key images and Low Key images make an intensive use of contrast, but in a very different way. When approaching a shoot of a dramatic portrait, the decision of making it a High Key, Low Key or “just” a regular image has great impact about the mood that this picture will convey. While High Key images are considered happy and will show your subject as a tooth-paste poster; Low Key portraits are dramatic and convey a lot of atmosphere and tension. Let’s explore those two dramatic lighting alternatives.
When looking at a High Key picture, you will probably notice two things right away. (Other than the happy-happy-joy-joy mood of the picture) The first thing is that the picture is bright. Yes – to create a high key image you need to set your exposure levels to high values. You will want to watch out, though not to over expose.
The other noticeable feature of High Key images is the lack of contrast. In addition for the tone being bright, you will notice that it is almost even across the scene. This is achieved by carefully setting the lighting of the picture. More about that later.
A third feature, that need closer attention to notice is the lack of shadows in the picture. The shadows cast by the model (or subject) are suppressed by lighting in the scene.